Frames are a new HTML extension by Netscape, allowing multiple pages to be shown in the same screen. The objective of this tutorial is to provide a basic foundation on frames development.
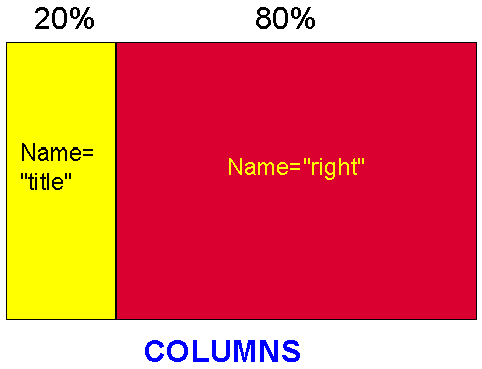
It is very hard to describe frames without thinking on a screen map and seeing an example of a framed page. The following figure shows a screen map with only two frames dividing the screen vertically (columns).
This example shows the implementation of the above screen map. Please note that if you click on an item of the left frame the results are displayed in the right frame. The right frame is the target of the left frame in this example. Each frame has a name, in this example title and right, respectively.
In order to display what you saw in the above example, six pages were created. A first page with the frame coding that I called "myframe.html"; a second page called "title.html" that displays the links to the other pages; a third page called "right.html", that is loaded in the right frame in the beginning; and three other pages that are the targets of the left frame: "option1.html", "option2.html" and "option3.html".
<HTML>
<HEAD>
<TITLE>my frame</TITLE>
</HEAD>
<FRAMESET rows="100%">
<FRAMESET cols="20%,80%">
<frame src="title.html" name="left" scrolling="yes">
<frame src="right.html" name="right" scrolling="yes">
</FRAMESET>
<no frames>
<body bgcolor="#ffffff">
<p>Linear page
</p>
</body>
</noframes>
</html>
Let me walk you through each one of these tags and explain what they do:
What would happen if the browser that accesses myframe.html did not support frames? In the above example it would display a regular page and ignore the frame tags.
How is this accomplished? Lets continue our tour of the code of the first example:
If you followed the tutorial up to this point you might be asking yourself: "But how can the left side frame call a link to display in the right side of the frame?" You are right if you thought that a regular link tag will not work for you want the result to display in the right frame not somewhere else. Lets take a tour of the title.html page (the one that loads in the left frame in the beginning) as shown below:
<HTML>
<HEAD>
<TITLE>titles</TITLE>
</HEAD>
<body bgcolor="#ffff00">
<h3>Choose one </h3>
<a href="option1.html" target="right">first option</a>
<a href="option2.html" target="right">second option</a>
<a href="option3.html" target="right">third option</a>
<p><a href="right.html" target="right">main right</a></p>
</BODY>
</HTML>
As you can see, the page starts as any other HTML page. Only the links are different, with a new element introduced in the link tag: target="right" . Right is the name I gave in the myframe.html page to the second frame, and target=" " allows me to direct the loading of the new page into this second frame. When somebody clicks on first or second or third option, what happens is that the page optioni.html is loaded in the frame named "right".
Finally, you navigate within a frame (among the various pages loaded on it) by right-clicking on the frame and selecting either go back or go forward. If you use the Back button in the top of the browser you will go to another page, not another frame, that you read before loading the framed page.
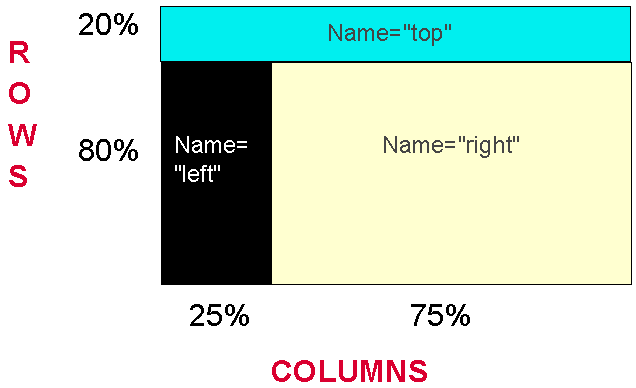
I decided to have a top frame with a title and general information on the new page. Then I decided that the left frame would display an imagemap, and the right frame would display the results of clicking on the imagemap. This design splits the screen vertically (columns) and horizontally (rows) among the frames.
The top frame got 100% of the columns but only 20% of the rows. Both the left and right frames got only 80% of the rows (the other 20% went to the top frame, as we saw). The left frame got 25% of the columns, while the right frame got the 75% remaining columns (this is similar to what I did in the first example). See here the final product.
I used the following code (shown up to the NOFRAMES tag) to implement my design:
<html>
<head>
<title> Second example of frames </title>
<frameset rows="20%, 80%">
<frame src="page1.html" name="top" marginheight="1" scrolling="auto">
<frameset cols="25%, 75%">
<frame src="page2.html" name="left" marginheight="1" scrolling="no">
<frame src="page3.html" name="right" marginwidth="3" marginheight="1" scrolling="auto">
</frameset>
</frameset>
<noframes>
Page2.html is the page (as we saw above) where I decided to place the imagemap and load it in the left frame. I created this page as any other imagemap page is created, but thinking that I was only going to have 25% of the screen columns to display it. The code for the page2.html is shown below:
<html>
<head>
<title>Background Colors</title>
</head>
<body bgcolor="#000000" link="#000000">
<A HREF="colors.map" target="right"><IMG SRC="colorimg.gif" ISMAP></A>
<p>
</body>
</html>
Not impressive, right? Yes, it is very simple. The only difference from the above to a regular imagemap tag is the inclusion of target="right".
An additional benefit of the use of frames with imagemaps is that if the browser cannot see images, for sure it cannot see frames, and the regular linear page is shown. This way the imagemap page can be designed for imagemap viewers only, for the text readers will get the linear, text, page.
For more on the syntax and development of pages using frames read the W3C frames page.
This page is maintained by Al Bento who can be reached at abento@ubalt.edu. This page was last updated on March 2, 2010. Although we will attempt to keep this information accurate, we can not guarantee the accuracy of the information provided.